Here, we are going to create a simple example of hibernate application using eclipse IDE. For creating the first hibernate application in Eclipse IDE, we need to follow following steps:
- Create the java project
- Add jar files for hibernate
- Create the Persistent class
- Create the mapping file for Persistent class
- Create the Configuration file
- Create the class that retrieves or stores the persistent object
- Run the application
1) Create the java project
| Create the java project by File Menu - New - project - java project . Now specify the project name e.g. firsthb then next - finish . |
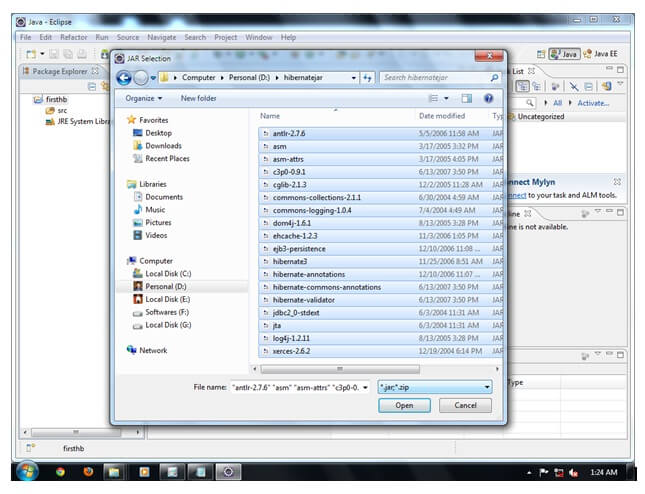
2) Add jar files for hibernate
| To add the jar files Right click on your project - Build path - Add external archives. Now select all the jar files as shown in the image given below then click open. |
In this example, we are connecting the application with oracle database. So you must add the ojdbc14.jar file.
3) Create the Persistent class
Here, we are creating the same persistent class which we have created in the previous topic. To create the persistent class, Right click on src - New - Class - specify the class with package name (e.g. com.mani.mypackage) - finish.
Employee.java
- package com.mani.mypackage;
- public class Employee {
- private int id;
- private String firstName,lastName;
- public int getId() {
- return id;
- }
- public void setId(int id) {
- this.id = id;
- }
- public String getFirstName() {
- return firstName;
- }
- public void setFirstName(String firstName) {
- this.firstName = firstName;
- }
- public String getLastName() {
- return lastName;
- }
- public void setLastName(String lastName) {
- this.lastName = lastName;
- }
- }
4) Create the mapping file for Persistent class
Here, we are creating the same mapping file as created in the previous topic. To create the mapping file, Right click on src - new - file - specify the file name (e.g. employee.hbm.xml) - ok. It must be outside the package.
employee.hbm.xml
- <?xml version='1.0' encoding='UTF-8'?>
- <!DOCTYPE hibernate-mapping PUBLIC
- "-//Hibernate/Hibernate Mapping DTD 3.0//EN"
- "http://hibernate.sourceforge.net/hibernate-mapping-3.0.dtd">
- <hibernate-mapping>
- <class name="com.mani.mypackage.Employee" table="emp1000">
- <id name="id">
- <generator class="assigned"></generator>
- </id>
- <property name="firstName"></property>
- <property name="lastName"></property>
- </class>
- </hibernate-mapping>
5) Create the Configuration file
The configuration file contains all the informations for the database such as connection_url, driver_class, username, password etc. The hbm2ddl.auto property is used to create the table in the database automatically. We will have in-depth learning about Dialect class in next topics. To create the configuration file, right click on src - new - file. Now specify the configuration file name e.g. hibernate.cfg.xml.
hibernate.cfg.xml
- <?xml version='1.0' encoding='UTF-8'?>
- <!DOCTYPE hibernate-configuration PUBLIC
- "-//Hibernate/Hibernate Configuration DTD 3.0//EN"
- "http://hibernate.sourceforge.net/hibernate-configuration-3.0.dtd">
- <hibernate-configuration>
- <session-factory>
- <property name="hbm2ddl.auto">update</property>
- <property name="dialect">org.hibernate.dialect.Oracle9Dialect</property>
- <property name="connection.url">jdbc:oracle:thin:@localhost:1521:xe</property>
- <property name="connection.username">system</property>
- <property name="connection.password">oracle</property>
- <property name="connection.driver_class">oracle.jdbc.driver.OracleDriver</property>
- <mapping resource="employee.hbm.xml"/>
- </session-factory>
- </hibernate-configuration>
6) Create the class that retrieves or stores the persistent object
In this class, we are simply storing the employee object to the database.
- package com.mani.mypackage;
- import org.hibernate.Session;
- import org.hibernate.SessionFactory;
- import org.hibernate.Transaction;
- import org.hibernate.cfg.Configuration;
- public class StoreData {
- public static void main(String[] args) {
- //creating configuration object
- Configuration cfg=new Configuration();
- cfg.configure("hibernate.cfg.xml");//populates the data of the configuration file
- //creating seession factory object
- SessionFactory factory=cfg.buildSessionFactory();
- //creating session object
- Session session=factory.openSession();
- //creating transaction object
- Transaction t=session.beginTransaction();
- Employee e1=new Employee();
- e1.setId(115);
- e1.setFirstName("sonoo");
- e1.setLastName("jaiswal");
- session.persist(e1);//persisting the object
- t.commit();//transaction is committed
- session.close();
- System.out.println("successfully saved");
- }
- }
7) Run the application
To run the hibernate application, right click on the StoreData class - Run As - Java Application.

0 comments :
Post a Comment